Thursday, December 12, 2013

Cabinet Organization List Generator Program

Download Cabinet List Generator

Several months ago, I revamped my spice cabinet organization scheme to accommodate the specific cabinet I chose to use for spices. An innovation of this accommodation was the inclusion of a piece of graph paper taped to the door of the cabinet, divided into three sections. These sections served to generally represent the location of the ingredient in the cabinet, and had column and row headers to indicate the nature of the row/column respectively. For the columns, the designations were:
  • "Seeds, Pods, Roots and Mixes", meant for spice-like seasonings and mixes of herbs and spices
  • "Bulk", which served as the overflow for the left and right columns and held larger containers (e.g. quart-sized mason jars)
  • "Plant Matter and Crystals", meant for herbs and crystal compounds like salt or agar-agar.
While the row designations were:
  • "Miscellaneous", meant for ingredients that did not fit well into the lower two row categories
  • "Herbs and Spices", meant for typical spice cabinet fare
  • "Salt, Pepper and Allium", which removed pepper and onion-like spices from the above row for the sake of packaging size (which is often larger for all three) and because the group of three feels very "basic", being more common to recipes in general than most other seasonings that would fit cleanly into the second row.
I must confess that I feel the list poorly abstracted in retrospect, though its clearly prototypical nature is usually accompanied by a certain inexperience or naivete. Additionally, it's a strong improvement over its immediate ancestor, in which I glued a piece of resilient paper to the front face of the shelves in my cabinet and simply wrote on it what type of spice was placed into the row immediately above the label.

A first benefit is the removal of sheer arbitration in deciding what goes where. For example, I had a row for single herbs and a row for spice mixes, but herb mixes like herbes de provence and fines herbes fit poorly into either category, while herb mixes as a whole are not common enough that a separate row would be appropriate (i.e. utilized enough to justify its existence). Another improvement is that the individual listing of each item allows for quick reference to see if the item is present in the cabinet (and exactly where it should go), removing the need to search through rows of spices thinking, for example, "I can't remember if I have star anise," and, conversely, not purchasing spices from the store only to later learn that a bottle of that spice was already owned. This individual listing has the added benefit, due to the fact that few spices filled the whole description space, of providing the opportunity to record when the spice was purchased, allowing me to more easily replace herbs and spices that are out of date.

There are some issues with the graph paper approach, however. The main problem is that hand-drawing such a list takes time every time one is made, and if mistakes are made in drawing the permanent (pen drawn) lines, the mistakes must either be tolerated or the list restarted on a new sheet. Since the labor cost of creating a new list was so high, it passively discouraged any experimentation with the list to optimize the categorization, and prevented me from trying to extend the concept to the organization of any of my other storage spaces. Working around grid lines also meant compromising on the size of the fields, and I found that the few spices that did flow to the end of a line usually left me in the position of trying to squeeze the purchased date into a very small space.

To combat these issues, I tried making lists on the computer, but found the process too tedious to do more than once, though the fact that I could print out many copies of the same list was helpful. Finding issue with the spacing and column distribution on the single manually-created list made on a computer, I resolved to create a program to automatically generate customized lists according to specified parameters. Though the program lacks some graphical interface polish, it accomplishes the task for which it was designed adequately. Currently, it only creates the structure of a list, with lines arranged in list format, though it prints off on a standard letter-sized piece of paper all of the way to the borders. Below is an example list that has had text added to the headers and sub-headers using a graphics editing program.


In addition to the above release of a portable executable (requires .NET 3.5 or above, or potentially Mono), I have released the code for the project in a github repository in case anyone would like to use it for other projects.

I will likely add a static page for the program when I get a chance, and will add any questions I am able to answer about its use to that page at that time. One thing I feel I should note about the program is that, while it is creating the list, it will appear as if the program has frozen and stopped working. This is not the case, it is working behind the scenes and will save your picture to the specified file when it is done.

Wednesday, October 30, 2013

Comments were not showing

I recently noticed that comments were not showing on posts, and changed some settings to attempt to rectify the situation. I believe that I've done so, as I'm now seeing comments below posts, but I would ask that anyone that notices them not showing up would please notify me.

Sunday, October 13, 2013

Seedling and Cutting Grow Box

After increasingly using thyme, marjoram, oregano and rosemary in my cooking recently, I resolved to purchase a plant of each, knowing they were on sale at a local grocery store. While I purchased a thyme plant--Thymus vulgaris, specifically--I forwent purchasing individual marjoram and oregano plants in favor of a hybrid of the two--Origanum x majoricum. Regarding the rosemary, I've noticed multiple rosemary plants near my home, and decided to take cuttings of the rosemary in lieu of purchasing a plant that I understand to be easily grown by clonal propagation. While in the past I've simply put cuttings I've taken in a bag under a light, I decided to convert an amazon shipping box to help these cuttings take root.

The box is a size 1BA (19" x 12.25" x 11.25"), that I received from Amazon for a moderately large delivery. I took said box and cut in half the front flaps, taping the top halves together and leaving the bottoms free to serve as doors. On the bottom of the top flaps, I used a strip of folded aluminum tape to serve as a sealing/light blocking strip which I duplicated for the right door, the latter of which is barely visible in the following picture of the unit with its doors opened.


When the unit is sealed, very little light escapes through the doors as a result of the previous sealing strips and the inner flap of the box, which was retained in the final design, and which is held closed over the bottom of the doors by way of strips of duct tape that are fastened to the sides of the box. As you will see, there is also an upper, tapered flap that I attached for the purpose of duplicating the benefit of the bottom flap with regard to its light blocking potential, as well as its role in helping the doors stay shut, as pictured below.


Also included is a food-grade thermometer, pictured above, that is pressed through the tape above the door to provide a measurement of the temperature inside the unit. I've also glued a piece of white drawing paper to the front of the box for the purpose of recording when plants have been put in (which you'll notice I have forgotten to use for this first batch). When in use, the light that I've selected provides a sufficiently intense, even illumination for the plants.


The light I have selected is a Philips LED flood bulb with a "Daylight" color profile (5000K white). This provides a very blue-tinted white light (as was typical with early "white" LEDs), that I understand is well-suited to vegetative growth. 

As an aside, the emission spectrum of these white LEDs (which are the same as "Royal Blue" LEDs, but with additional phosphors to even the light out to blueish-white by adding green-yellow-orange light) corresponds roughly to the lower absorption maximum for chlorophyll b (with peaks at 453nm and 642nm) while almost completely missing that of chlorophyll a (with peaks at 430nm and 662nm). Conversely, the red LEDs popular in flowering bulbs are usually red at 660nm, corresponding to the upper absorption maximum for chlorophyll a. To extend this briefly into speculation, a page on planted aquarium lighting indicates that red light stimulates "long, leggy growth" while blue light stimulates "compact, bushy growth", which, given the use of red LEDs for flowering and blue LEDs for sprouting, leads me to believe that chlorophyll a is mostly responsible for plants growing towards light and flowering, while chlorophyll b is more responsible for root formation and growth thickening.

That said, the bulb that I selected, while using LEDs, produces enough heat that I felt I should vent the box somewhat to allow the heat to escape. To do so, I cut holes in the left and top of the box, and covered the holes with lengthwise-cut halves of toilet paper tubes, taped down with aluminum tape.


This mitigates the problem well enough, with observed temperatures inside the unit (after having it on and closed for some time) being only 2-3 °F over ambient, thought the heatsink portion of the bulb is decidedly quite hot. As I expected that even an LED bulb would still run quite hot in an enclosed space, I used a mountable ceramic lamp socket purchased from a chain hardware store, mounted through the top of the box with a disc of cardboard used as electrical insulation. The hole near the pictured socket is the top vent.


While I have yet to confirm that the cuttings will be viable (as I only took them 3 days ago), I feel positively about the execution and design of the unit. Having been made with a cardboard box, the total cost of parts is around $25, with the LED bulb responsible for about $20 of that figure. I also feel positively about posting again, having taken a significant break after moving from College Station to another Texas city. As I've been engaged in more creative ventures, like this one, I hope to provide more regular updates. 

Wednesday, February 13, 2013

Repurposed Cardboard Black Garlic Oven (Part 1) & Sous Vide Project Failure

I've started work on a second model of my black garlic oven. This design has a vertical chamber to increase the amount of garlic that can be held. My target capacity is thirty-six jars arranged on four shelves, with a heating bulb on in the bottom of the unit. Having the bulb on the bottom of the unit should encourage passive convection, since the top of the chamber is where heat will most easily collect and leave the system. As hot air from the bulb travels upward and cool air  from the ceiling travels downward, some convection should occur.

From a materials perspective, I reckoned that the expanded polystyrene insulation of the first design was excessive. This time, my primary materials are cardboard from shipping boxes and packing peanuts. This document at fire.tc.faa.gov indicates (in table 1) a mean temperature of 612 °F with a lower bound at 575 °F, both temperatures well above (likely more than double) what this system will encounter.


As depicted in the picture, I used starch glue to make a four-layer shell. The recipe for my starch glue was 100mL of starch in the above-pictured pyrex cup with water to 500mL in the cup (also, I understand that 1 Tbsp. of salt added to the mix will discourage mold growth). I then microwaved the stirred mixture in thirty second intervals, stirring between, until the mixture thoroughly gelled. The benefits of this glue are low price (since a full recipe uses a trivial amount of corn starch), high bonding strength for paper and a stability in heated environments. I used a grooved trowel to apply the adhesive to the cardboard, and held the glued surfaces together using bar clamps and some surplus cheap flooring strips I had available, as pictured below.


The starch glue dries quite slowly (a number of hours), so the assembly of the four layer box took almost a week. The finished shell is stable, fairly rigid, and about three quarters of an inch thick, as pictured standing below.


In part two of this project, I will add spaced extensions to the shell, to be filled with packing peanuts and scrapped expanded foam. With the three inches of combined insulation (of various effectivenesses), I anticipate a total R-value of R-5 ‒ R-9, which seems ample if energy conversation is the goal.

The "Sous Vide Project" mentioned in the subject of this post was a series of projects I had planned (at an elevated expense relative to my other projects) to construct, from scratch, a water oven to be used for sous vide cooking. I planned to pump water from a high-temperature plastic chafing dish to a deep metal dish containing a heating element. I purchased most of the equipment needed for this venture, and all but the chafing dish and pump arrived (coincidentally, the two most potentially costly items), the dish because the price quoted on the site was wrong (I should have known that half price was too good to be true) and the pump for reasons yet to be determined (but I have been unable to get a response from the seller).

Because the chafing dish I intended to use is normally expensive, and since the pump was the only reasonably priced example I could find on the internet, the project series has been scrapped. I offer this as an explanation for the sizable interval prior to this post, fully unintentional as it was. I will likely buy a consumer water oven at in the near future for sous vide use, and am particularly eyeing the Sous Vide Supreme.

Monday, January 7, 2013

Temperature Controller

I spoke previously on here about adding a temperature controller to my Black Garlic Oven design, and appreciated CubeConvict's recommendation of the STC-1000. I found this general use controller intuitive in ways, though the software interface is somewhat erratic in its utilization of its buttons.

To illustrate this, consider the hardware connections on the rear of the unit. The connections are all screw terminals, with pairs for power, sensors, cold and hot, in that order. I found this configuration straightforward and appropriate the the application. The software interface, however, offers challenges. The power button is labeled with a standby symbol, which alone is confusing. Furthermore, consider the way to change temperature. On the main screen, one holds the "S" key for 3 seconds, selects a menu item using "S" and then adjusts the setting by holding "S" and pressing "Up" or "Down". When the desired setting has been reached, one presses the Standby/Power button to commit the change.

Thankfully, the unit required very little adjustment. For housing, I purchased a PVC box (As pictured in this MakeProjects post) and added a power outlet and binding posts for the sensors. After splitting the plugs on the power outlet, the unit allows me to simply plug the oven into the "heat" plug.


The binding posts and banana jacks purchased from RadioShack, with the binding posts being advertised as "insulated" (though it would take a far stretch of the imagination to consider these meaningfully insulated). The binding posts are screw-on, and I drilled holes to attach the power outlet. The STC-1000 has mounting brackets included that secure it to the lid. I used disconnect terminals inside to attach the power cord to the controller and the outlet (the electrical tape wrapped bit connection the end of the power cord's sheathing), and spade terminals to provide power to the outlet.


Everything fits easily inside the 4"x4" PVC box that I purchased from my local hardware store. To secure the power cord inside the box, I put two zip ties on the cord and heat shrink wrapped them with a glob of glue inside the tube.

Part of the beauty of this controller is that, in an arrangement such as this one, it can be used to control both heating elements and cooling systems (such as an AC or a chest freezer), allowing it to be used for any application between -50°~90°C. I will likely use the STC-1000 for many other fermentation chambers in the future.

Update (2013-01-07) - Circuit Diagram:
A barebones illustration of the circuit with a heating incandescent and cooling appliance plugged in.

Saturday, January 5, 2013

Garlic Amino Salt

Taking a cue from Chalt, I decided that I should like to make an amino heavy salt. I have previously been led to believe that the flavor advantage of sea salt, particularly highly regarded sea salts such as sel gris, fleur de sel and varied other examples, is the mineral and amino content imparted by the brine from which it is collected. My intention in this case was to create a reduced salt with far-increased amino content, intended to be used in a similar way to soy sauce, but without the addition of liquid. I'm calling this salt "Garlic Amino Salt", as its ingredients are sea salt, alderwood smoked salt, black garlic powder and minced preserved garlic.


As this is a small-batch experimental recipe, I started by adding 250 mL of Spring Water to a medium saucepan over high heat. Once the water started boiling, I reduced the temperature to medium, and added 50g of an ordinary, mid-price Sea Salt.


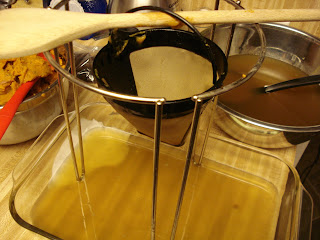
I then began attempting to super-saturate the solution with sea salt. After adding 25g more salt, I discovered that the solution was too thick, and added 100mL more water. The solution at that point seemed too thin. I then added 3g of smoked salt and 5g of sea salt, and started adding water in 15mL increments. After 5 such increments, I decided that the solution was appropriately dilute as to be supersaturated at boiling. I then added the black garlic and minced garlic, boiled for 2 minutes more, and poured the mixture through a plastic filter I purchased online into a 2.2qt Pyrex baking dish. It was then placed in an oven at 275F, as shown.


I checked the solution at 15 minute intervals, observing the drying taking place from the outer rim of the dish inward, as illustrated in the following sequence. Note that significant precipitation happened in the first 15 minutes of the process.


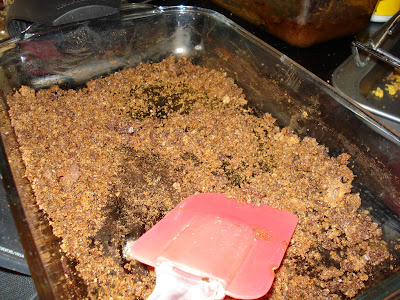
After 90 minutes of such, I found that the solution had dried into a loose cake. I removed the dish from the oven and stirred it using a silicon spatula. The resulting aggregate was semi-moist, with pockets of completely dry salt interspersed. I decided that the mixture could use more drying and placed it back in the oven for another 30 minutes.


At this time, I removed the salt from the oven and stirred it up once again. It had become dry throughout, excepting a few small, moist clusters that nonetheless crumbled between my fingers. Tasting the new salt, it was intensely savory, with a significant but far-reduced saltiness from the original sea salt. I think it would work well as a salt replacement at anywhere from 1:1 to 1:2.5, for any recipe that the cook wanted to make more savory and wouldn't mind including black garlic flavor.


I believe this recipe would be helped by the inclusion of a vacuum hood for the reduction of the salt, coupled with a significant reduction in drying temperature. When using a vacuum hood, however, I would double the black garlic content and remove all minced garlic. The inclusion of some (5g on the light side to 15g on the heavy side) dried roasted garlic would be preferable to minced garlic in this case.

This experiment had an unexpected but not altogether unwelcome side effect. On a first attempt, I accidentally added the garlic and black garlic early, and decided I should start over. Not wanting to waste perfectly good black garlic, I put the failed recipe in a Pyrex loaf dish in the oven, without filtering, and the garlic mixture reduced down to a thick paste. I intend to put it in a yet undetermined amount of olive or canola oil, and use the result as a cooking paste or condiment.

Experimental data was transcribed to a text file, available on Google Drive.

Thursday, December 13, 2012

Sweet Potato Syrup

There is an old article from 1920 about the existence of diastase in sweet potatoes. Diastase is a general term, referring to enzymes that facilitate the decomposition of various polysaccharide starches into maltose, a disaccharide. As I understand it, sweet potatoes contain a substantial amount of beta amylase, and a small amount of alpha amylase (the content increases with aging). The above linked article refers to an older process determined by the US Department of Agriculture (I have not been able to find the article on their site) for making sweet potato syrup using malt, for its alpha amylase content. This is my second foray into sweet potato syrup production, and it went much better than my last time.

I started with 10 large sweet potatoes, acquired from my local grocery store. I am not sure of the weight of the purchase, as I was going to record it from my receipt from the grocery store, but I managed to misplace the receipt. I took each potato and cut it into four pieces length-wise, and then cut those wedges into individual quarter-slices, as shown below.


In the 1920 article, they talked about using shredded sweet potatoes or sweet potato flour. While I think that the shredded sweet potato would have worked well (as well as saving my poor thumb, the tip of which I cut off while I was chopping sweet potatoes), I think that flour would have made filtering an enormous hassle. The quarter-slices worked well, however, yielding two large bowls of slices.


Endeavoring to follow the paper's steps somewhat, I decided to roughly follow their process, which seemed to work pretty well. I added the sweet potatoes to the pan with water to cover (I added a little extra water, which I'll comment on later in the article), and started heating up the mixture over medium heat.


After fifteen minutes of heating, I checked the temperature on the electronic thermometer, for which you can see a bit of the sensor and its wire in the above picture. The temperatures were recorded during heating as follows:

Temperature Fahrenheit (T) at time elapsed in minutes (t) with stove heat setting (Q)
Mins. °F Heat
15 157 5
30 160 1
70 180 3
80 189 5
90 197 5
100 208 5
105 210 5
110 212 5

After boiling, I mashed the sweet potatoes using a potato masher. This was complicated by the fact that there was more water than I had intended, which meant that it was harder to be sure that all of the chunks were processed (many weren't). I used a four step process to extract liquor from the pulp, and it still wasn't as effective as I had hoped. My steps were, in order, to sieve using a chinois and pestle, to filter through a metal mesh coffee filter, to filter through paper coffee filters and then to reduce in the oven overnight, as illustrated.

It's not easy to see in the last picture, but the syrup that has been filtered through paper coffee filters still has a fairly small amount of sweet potato pulp in it. I set the oven at 220°F and let the syrup sit for about 8 hours. When I checked it, it was much sweeter, and had reduced by about half.

I intend to improve the process in the future, and I have some very specific ideas for how to do so. Instead of integrating the enzymatic action and heating to boiling, I'll use water to cover heated to about 170°F. After adding the sweet potatoes, I'll put the whole concoction in my (now temperature controlled, more about that in a later post) light bulb oven, and let it convert for about 2 hours. I'll then boil it on the stove and, instead of mashing the pulp and sieving it, I'll remove most the water by straining, and then use a hand blender to process it into a paste. I'll then create a large filter by putting a piece of wool felt over the top of a bucket, with the cut off top of another bucket holding it in place. As I understand it, wool is better for filtering syrup, as it doesn't clog as easily and filters more thoroughly.

Next time I do this, I'll likely also use malt in the mixture. My intention is to make a simple sweet potato beer and, since sweet potato doesn't contain the necessary amino compounds to support yeast fermentation, malt is necessary for the conversion into beer. This sweet potato and malt beer will then be converted into vinegar, to be used as the base for a Worcestershire-like sauce, possibly tomato-based, that I'll be making.